I was off of work on Friday so I decided to make a new wreath because I didn’t have one for spring yet. I searched through Pintrest and had a couple of ideas. I headed to Joann’s with coupons in hand and settled on trying out a DIY Spring Yarn Wreath with felt flowers. I bought everything I needed for 11 dollars. Thank you coupons! I love Joann’s because they let you use multiple coupons at once.
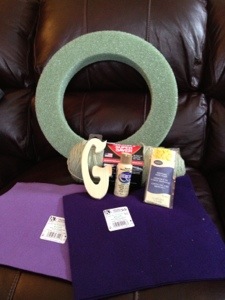
Here are the supplies I assembled, a foam wreath, yarn, felt in different colors, yellow rick rack and then I also had a wood “G” which I ended up not using. So I will save that for another project.
So I started off by wrapping the yarn around the wreath and tying a knot in the back. I then proceeded to wrap the yarn tightly around the wreath. Now this took a long time. It might be the type of wreath I chose or because I’m a little OCD sometimes. Either way it took me awhile but I turned to my DVR and settled in for some work. Tyler was kind enough to come home and do the last bit for me.
After finishing the yarn all the way around the wreath I then proceeded to make felt flowers. I searched a lot online to find a good tutorial on how to do it then I had Tyler read it and he helped me with these. What a good husband right?
So to begin you cut a wavy circle from the felt. For my larger dark purple flowers I did one big circle from each piece. So you take that wavy circle and begin cutting it in a circular motion and keep cutting until you get to the end. At the end you will have a small circle which you should keep intact.
Your next step is to start at the smaller end without the circle and start rolling it up tightly. I tried to keep the wavy end lined up with each other as I continued to circle around. That way once I was done it had a little flowery look to it. It’s hard to explain, it’s a little bit of trial and error. Just wrap it tightly and once you get to the end you will place the circle on the back of the flower.
Once I got the circle to the back of the flower I hot glued it down then proceeded to add hot glue wherever I felt like it was needed on the outside of the flower. Then viola, felt flower! They were a lot easier than I had anticipated. Mine don’t look perfect by any means but I thought they turned out pretty good for my first go at it!
For the smaller light purple flowers I did two circles per piece of felt. I then took some yellow rick rack and wrapped it around the wreath and hot glued it on in the back.
So after that I hot glued the flowers to the wreath in the lay out that I wanted. I then used some yarn to hang it up. Hanging the wreaths is always where I struggle so let me know if you have any great ideas for that?
I was very excited about how this turned out! I love it and it is very springy but can also be used in other seasons too!
Source: How to Make a Yarn Wreath for All Seasons


[…] ← Spring Yarn Wreath […]